In order for Bisync to work smoothly, we would require you to take the initial onboarding steps to assist us in getting you started. Download the Onboarding Template here.
You can also download the Bisync Onboarding Checklist if you have more than 1 outlet which requires our help to create. For multiple outlets, you will need to get in touch with our Sales and Technical team.
For single outlet users, you can sign-up and get going with our system
Bisync Onboarding Checklist
For companies with single outlet, you can follow the simple steps of registering the outlet here.
For organisations with multiple outlets and Central Kitchen, the document is to help us create the profiles for the outlets and users and as a document for the organisation to keep as a documentation.
Vendor Product and Recipe Inventory Template
This template consist of 2 parts.
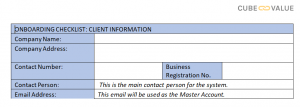
Part 1: Vendor Information
Part 2: Vendor Products and Recipe Ingredient

Part 1: Vendor Information
The name of the supplier you purchase from, including the contact details. This will allow Bisync to have accurate details when you generate Purchase Order via Bisync.
Please feel in the details base on the fields stated as all the fields are mandatory for Bisync to maintain accurate data.

Part 2: Vendor Products and Recipe Ingredient

The left part of the sheet is for the the product name, product code and the unit of measurements as controlled by your suppliers.
If the supplier does not include a product code in their product, Bisync will automatically generate a product code for the products sold.
The detail content of the delivery unit also helps you in your inventory count when you use Bisync.
On the right side of the sheet, you fill in the recipe ingredient, the common name as used by your operation for each products. The recipe ingredient will be reflected in the Smart Ingredient.
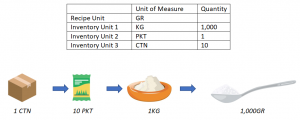
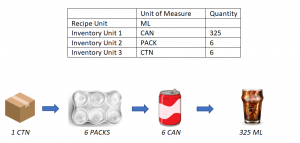
Required fields that you need to indicate are the Category, Groups, Inventory Unit and Recipe Unit
Recipe Unit = The measurement you use the ingredient in your recipe.
Inventory Unit 1 = The UOM for your Inventory
Inventory Unit 2 = The UOM for your Inventory
Inventory Unit 3 = The UOM for your Inventory
Example 1 : Outlet buy 1 Carton of Salt. Each Carton contains 10 packets of salt at 1kg each.
Example 2 : Outlet buy 1 Carton of Soda. Each Carton contains 6 Packs of Soda, each Pack contains 6 Cans of Soda at 325ML each.
If you have an Ingredient ID you have previously set in your accounting system, do key that into the respective Ingredient’s ID.
If you are not sure of the Category and Groups, you can click on the DATA sheet in the excel.
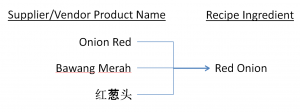
Example of Supplier Name vs Recipe Ingredient
Example: Red Onion is the common name used by your outlet
Suppliers might list the product as Onion Red or Bawang Merah or 红葱头
When Bisync attach the vendor’s products to your ingredient, our system will be able to indicate to you how much Red Onion is in your inventory irregardless which supplier you purchased from.
What your Purchasing Department use is the Supplier’s Product Name.
What your Chef/Kitchen Team use is the Ingredient Name.
Once all the documents are filled, you can send the document to the sales representative that manages your account.
A communication link will then be created between our onboarding team and your company to provide the necessary onboarding support to get you started.
If you have multiple outlets all using different ingredients, or if you are running a CK as well, please prepare the Onboarding Templates for the respective locations.
Downloadable Document: