Ordering from Suppliers is a breeze on our simplified ordering system. Learn to create Purchase Order on Mobile, click here
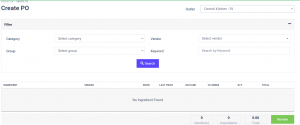
To create PO, in Operations, select Create Order.
Note: If a user has ![]() in the Permission, the user can only create a Purchase Request.
in the Permission, the user can only create a Purchase Request.
To change the user’s roles and permission, see Create User Roles & Permission.
You have 2 ways to create PO/PR, by using the Order Template or through the manual add function.
To use the Order Template, just click on ![]() and select the template you want to use.
and select the template you want to use.
To search for the product, use the filter function to find using Category and Group or Vendors. If you know the product you want to buy, just type in the keyword and click ![]() .
.
Example below is filtered by Vendor. For Virtual Vendor products, you can update the price and enter the quantity you want to buy before clicking ![]() .
.
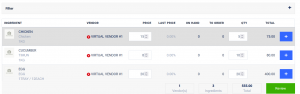
You can the quantity On Hand (in your inventory) and a suggested order quantity under To Order.
Note: Suggestive Ordering function requires minimum of 3 months of transactions for machine learning to understand your outlet’s spending and usage behaviour.
Details of how many vendors you buy from and how many products was added including total value can be seen at the preview next to ![]() .
.

Click ![]() to open the Review Cart.
to open the Review Cart.
Note: If you used ![]() ,you can only edit/change the quantity in the Review Cart.
,you can only edit/change the quantity in the Review Cart.
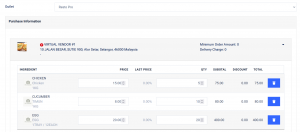
You can update the price and quantity or delete the product in this section.
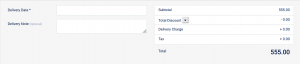
Scroll down to enter the delivery date and other remarks. Transaction value is also displayed.
If you are buying from multiple suppliers, you can scroll down to see the next supplier’s cart details.
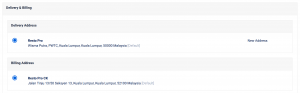
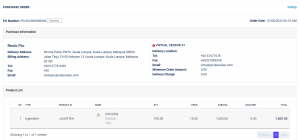
To complete the Purchase Order, review the Delivery Address and Billing Address. If you need to send the products to another location, you can change the delivery address here.
Once you have confirmed the deliveries you want to buy from, click Order to generate the PO.

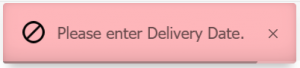
Please note that it is compulsory to enter delivery dates for each PO you wish to generate or you will not be able to proceed and get this Alert:
Once you have successfully place your Order, you can select Active PO to proceed with the next step.
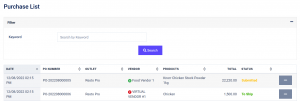
Example of two type of Purchase Order as seen here. For Cloud Vendors, the status will be shown as ![]() . For Virtual Vendors, the status will be switched to
. For Virtual Vendors, the status will be switched to ![]() .
.
A Cloud Vendor will have a C icon besides the name
Example: ![]()
A Virtual Vendor will have a V icon besides the name
Example: ![]()
Difference between Cloud and Virtual Vendors
Cloud Vendor is a user of Bisync that manages their own inventory and pricing, buyers are not allowed to update the prices from a Cloud Vendor’s product list.
Virtual Vendor is a non-user with the database of inventory managed by the users in which, pricing shown are the last buying price and buyers can update the prices that will not be reflected on the global Bisync database. RRP prices of the products that is viewable by all users are updated by the Bisync team.
For ![]() , you will need to manually send the Purchase Order to the supplier.
, you will need to manually send the Purchase Order to the supplier.
Besides the Status, click on the ![]() to see
to see ![]() . Click on
. Click on ![]() .
.
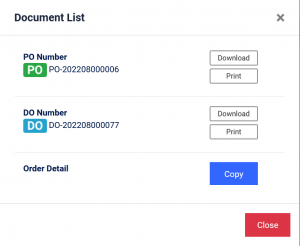
Click on Copy and you will be able to send the PO via Whatsapp.
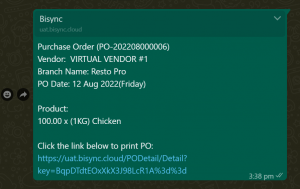
You can also click Download to get the PO onto your drive if you want to send by Email.
Virtual Vendors will only be able to view and download the PO as generated from Bisync. For Virtual Vendors that wants to control your own prices and product list. See Register as Vendor to learn how to register yourself in our system.
See Receiving and Consolidation to learn how to consolidate the supplier’s deliveries into your Bisync Inventory.